Thursday, 14 February 2013

proteus program

proteus program : circuit simulation for design circuit ,so it contains a lot of componet
like pic :micrcontroller,avr micrcontroller ,8051 micrcontroller .
protues program size is almost 88 MG,to download use this link      Proteus Program download
pic micrcontroller  with each types is in proteus program 
so ,advice you to try it to simulate your work ,after that ,buy the component from market .
proteus program is the best program simulation for micrcontroller in specific and circuit in general .

Tuesday, 12 February 2013

mbedded System: Smarts For Devices and Systems

What is an embedded system?
Embedded systems are stand alone computing devices or centers usually dedicated to performing limited computing functions reliably, securely and with minimum  costs.   

main component in embedded system is Micrcontroller IC.

You find embedded systems(Micrcontroller) or embedded computer systems all around us.  Some are low cost and mass produced such as DVD player ,
medical instrument-ultrasound machine, aerospace-communication satellite, factory automation-industrial boilers.

What are top 5 reasons one would choose an embedded system(Micrcontroller) over a PC?
  1. Security (hacker proof)
  2. Reliability (work without failure for years)
  3. Environment (broad temperature range, sealed from chemicals, radiation)
  4. Efficient Interaction with user (fewer buttons, touch) 
  5. Integrate with design
Pic Micrcontroller is easier in programing more other type of micrcontrollers.
so i advice you that use pic Micrcontroller for your project and mikroc program .
What are some features expected in future embedded systems?
  • Energy harvesting or energy scavenging as replacement for power system.
  • Smaller footprint to allow coupling to the device itself. 
  • Fault detection/self correcting algorithms along with backup processors are expected to become common in future.


Sunday, 10 February 2013

burn code into pic micrcontroller


how burn code into pic micrcontroller :
pic microcontroller is device contain ROM ,so can to program .
to burn, need first program for write code like mikroc program .
second : need only hex file of code
third :need serial cable to connect pic micrcontroller with computer
fourth :sure that program give you message successful of burning.
note : burn pic  micrcontroller is different from company to another and there is some other ways.
pic microcntroller in general and pic micrcontroller in specific has main advantage which allow to burn code and reburn again .

details with images in next article .


Thursday, 7 February 2013

main component of embedded system is Micrcocontroller


important concept :

Embedded system :
Main component in Embedded system is microcontroller .
What is PIC microcontroller ?
Is small computer with CPU, ram, rom.
Why do you prefer to use PIC microcontroller ?
Let me ask you : if your project  is very big  that mean number of hardware component is huge .
So any mistake in any component ,project will not.
So to reduce number of component of project and more easier to discovery any error ,use microcontroller
Because PIC microcontroller use code to burn ,so you can debug ,update code easily .
I prefer PIC  microcontroller for reason that it is easy in programming .
Note : deal with PIC microcontroller is low voltage about 6 voltage ,so if you want to run device with more voltage ,will need for  relay.

run some devices using keypad

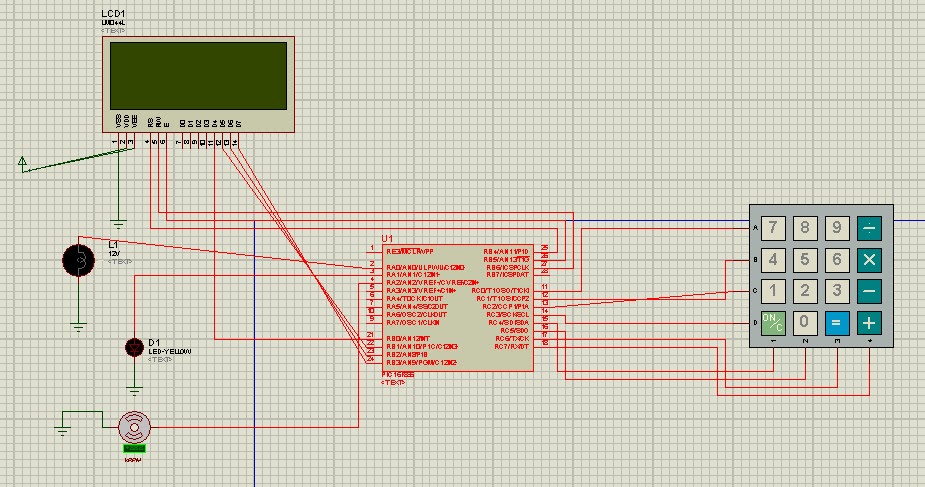
circuit contain PIC micrcontroller ,led,lcd,motor and bulb which are played by keybab


code Mikroc for pic micrcontroller :

sbit LCD_RS at RB4_bit;
sbit LCD_EN at RB5_bit;
sbit LCD_D4 at RB0_bit;
sbit LCD_D5 at RB1_bit;
sbit LCD_D6 at RB2_bit;
sbit LCD_D7 at RB3_bit;
sbit LCD_RS_Direction at TRISB4_bit;
sbit LCD_EN_Direction at TRISB5_bit;
sbit LCD_D4_Direction at TRISB0_bit;
sbit LCD_D5_Direction at TRISB1_bit;
sbit LCD_D6_Direction at TRISB2_bit;
sbit LCD_D7_Direction at TRISB3_bit;   //above is initialize for LCD ,this is in help
char txt1[] = "Hello";    // string to display on LCD
char keypadPort at PORTC;
unsigned short kp;

void main()
 {
  TRISB.RB6 = 0;
  TRISA = 0;
  PORTA = 0;
  PORTB.RB6 = 1;
   Lcd_Init();                        // Initialize LCD

  Lcd_Cmd(_LCD_CLEAR);               // Clear display
  Lcd_Cmd(_LCD_CURSOR_OFF);          // Cursor off
  Lcd_Out(1,6,txt1);
   while(1)
   {
   do
   {
    kp = Keypad_Key_Click();
   } while(!kp);
 
  if(kp == 1 )
  {
  }
  else if(kp ==2)
  {
      PORTA.RA0 = 1;  //Run bulb .
  }
  else if(kp == 3)
  {
      PORTA.RA1 = 1;//Run led
  }
  else if(kp == 4 )
  {
      PORTA.RA2 = 1;Run Motor.
  }
  else
  {
      PORTA = 0;
  }
  }
 }

Wednesday, 6 February 2013

LED and Switch

run LED after press button or switch

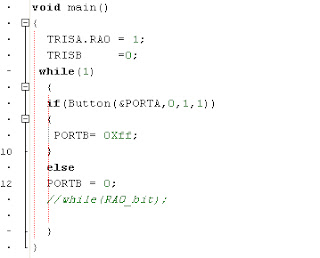
if(button(&porta,0,1,1).
porta : port which switch connect with it.
0 : bin of porta number 0.
1: leave it like this ,details in help of Mikroc Program  .

 when click switch ,blue and red LED will be on.

Tuesday, 5 February 2013

traffic light circuit and code using pic microcontoller

traffic light circuit and code using pic microcontoller
code using mikroc :


Note : traffic light is in silmulation ,so in real application will need to relay to increase signal or voltage to 220 v.